Many readers have asked "What is the best GUI toolkit?". There is no single answer to this question, and I won't try to lobby for my GUI of choice. Use whatever works best for you and your users.
I use the wxRuby library. It's cross-platform, provides a native look-and-feel, and is easy to install (via a gem) and distribute with your application (via RubyScript2Exe). Further features can be found in the wxRuby wiki here. wxRuby is the Ruby interface to wxWidgets, a very stable and widely-used widget toolkit.
Installing wxRuby is simple using RubyGems:
gem install wxruby
Though you can use a GUI designer, creating most forms "by hand" is probably simpler than you suspect. A useful wxRuby user interface can be created in less than 50 lines of code, as we shall see...
Let's create a simple form with a label, text box, combo box, and button. We start by requiring the wx library and including the Wx namespace:
require 'wx'
include Wx
We create a new class which inherits from the
Wx::Frame class and includes an
initialize method:
class MyFrame < Frame
  def initialize()
    super(nil, -1, 'My Frame Title')
  end
end
The Frame class'
super constructor method takes the following arguments (all but Parent are optional):
Parent: The window parent. This may be NULL. If it is non-NULL, the frame will always be displayed on top of the parent window on Windows.
ID: The window identifier. It may take a value of -1 to indicate a default value.
Title: The caption to be displayed on the frame’s title bar.
Position: The window position. A value of (-1, -1) indicates a default position, chosen by either the windowing system or Widgets, depending on platform.
Size: The window size. A value of (-1, -1) indicates a default size, chosen by either the windowing system or Widgets, depending on platform.
Style: The window style (ie, if the minimize, maximize, and close boxes appear on the Frame).
Further details on the Frame class can be found in the wxRuby wiki
here.
Next, let's add the code to the
initialize method to create a panel, which will contain the other controls:
@my_panel = Panel.new(self)
The
self passed to the
new constructor is a reference to the Frame object, which we are passing as the parent of the Panel object.
Next, we'll create a variety of controls, passing the newly created
@my_panel as the parent of each control:
@my_label = StaticText.new(@my_panel, -1, 'My Label Text',
  DEFAULT_POSITION, DEFAULT_SIZE, ALIGN_CENTER)
@my_textbox = TextCtrl.new(@my_panel, -1, 'Default Textbox Value')
@my_combo = ComboBox.new(@my_panel, -1, 'Default Combo Text',
  DEFAULT_POSITION, DEFAULT_SIZE, ['Item 1', 'Item 2', 'Item 3'])
@my_button = Button.new(@my_panel, -1, 'My Button Text')
I recommend assigning all your form controls to instance variables. This is the reason for the '@' preceding each control variable name.
We want to bind the button click to a "my_button_click" method which we will add to this class later. We do with the
evt_button method:
evt_button(@my_button.get_id()) { |event| my_button_click(event)}
Now we'll proceed to the layout: arranging the controls in the Panel. We'll do this using a
BoxSizer, which we'll have arrange the controls vertically:
@my_panel_sizer = BoxSizer.new(VERTICAL)
@my_panel.set_sizer(@my_panel_sizer)
Next we add each control to the panel's sizer by calling the sizer's
add method:
@my_panel_sizer.add(@my_label, 0, GROW|ALL, 2)
@my_panel_sizer.add(@my_textbox, 0, GROW|ALL, 2)
@my_panel_sizer.add(@my_combo, 0, GROW|ALL, 2)
@my_panel_sizer.add(@my_button, 0, GROW|ALL, 2)
See the
Sizer.Add documentation for an explanation of the various parameters.
Our last line of code in the
initialize method makes the frame visible:
show()
Don't forget to add the my_button_click method that is called by the button click:
def my_button_click(event)
    # Your code here
end
That concludes our MyFrame class. Now we want to create a MyApp class that will call our MyFrame class:
class MyApp < App
  def on_init
    MyFrame.new
  end
end
Finally, we create a new instance of our MyApp class and call its main_loop method:
MyApp.new.main_loop()
View the complete code
here.
There you have it. A complete, but simple, wxRuby form. It's not much to look at...
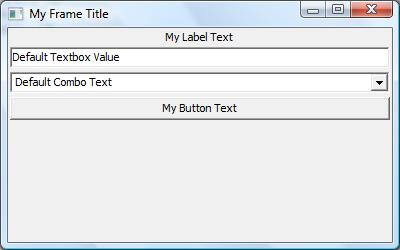
...but it demonstrates the basics and we'll enhance it shortly.
Soon, we'll cover related topics: dressing up our GUI a little, using the wxSugar extensions, using a Forms designer such as
wxFormBuilder.
Questions? Comments? Suggestions? Post a comment here or send me an email message.
Thanks for stopping by!


